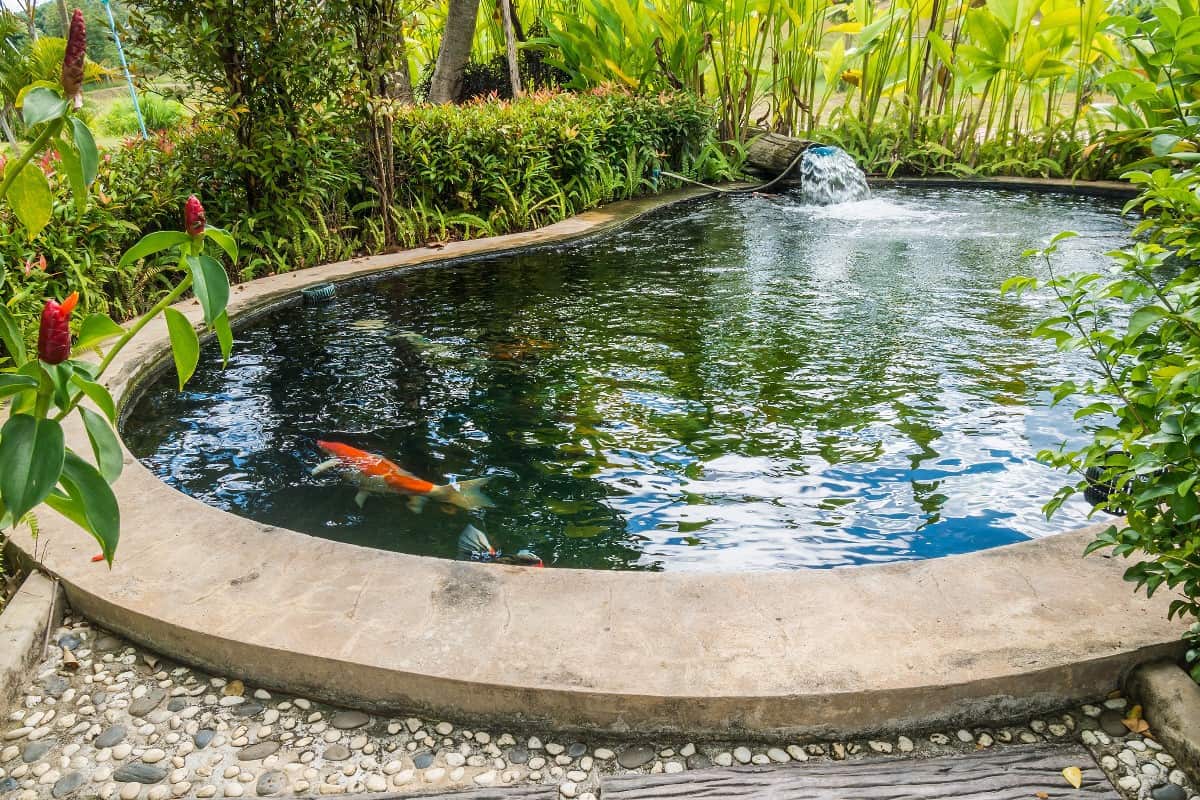
Construction of the pond is a perfect diversification of the home garden. It perfectly blends with the natural vegetation and increases the aesthetic value of the surroundings. You don’t have to have a lot of space to decide to equip your garden with a water reservoir. We will explain to you how to make your own pond step by step
Before you start building a pond, you need to consider what size you want your pond to be, and you also need to take into account how much space you have. The correct location of the pond is particularly important. It must be located in such a place so that it does not develop algae, leaves do not fall into it, and that it fits well into the design of the garden or the plot
The first thing you need to consider is the size of your pond. You should know that the larger the pond, the easier it is to maintain its biological balance, which will help keep the plants in perfect condition
In a small and shallow pond the water heats up quickly and contains little oxygen, which promotes algae growth. In this case it is necessary to constantly clean the tank with filters and chemicals. The pond should also not be exposed to sunlight all day long because this causes algae to grow and excessive evaporation. On the other hand, it’s a good idea to locate the pond away from trees so that leaves don’t fall on them, which can decompose and pollute the bottom
The work on building a pond begins with defining the boundaries of the pit. We define the outline of our pond in the place we choose. The most convenient way to do this is with a garden hose, string or spray paint. Thanks to this it will be much easier to assess the shape and dimensions of the pond. We repeat this activity for each depth sphere so that the excavation is made accurately
After accurately determining the boundaries of the water body, we can proceed to the excavation. We perform this activity from the outer contour and then head inward, taking into account the successive depth levels
The excavation does not have to be very precise. The pond liner used is flexible enough to cope with small differences in level. However, it is worth ensuring that the excavation is made in accordance with the previously prepared design. At the deepest point it should be about 100 cm
At a depth of 60 and 30 cm we form shelves about 30 cm wide, on which we later place baskets with aquatic plants. The edges of the bottom should be formed with a slope so that the substrate does not slip under water pressure. All edges of the pond should be at the same level. When digging out the soil, it’s a good idea to remove any branches, stones or other items in the soil so that the pond liner is not punctured.
After digging out the bottom it’s a good idea to create a 10 cm layer of sand in the formed basin. It will protect the edges of the pond from slipping and will make the foil more secure against damage by roots. If our tank has a complicated shape and many depth zones, it is worth using a base instead of sand. Geotextiles, agro-textiles or mineral wool are commonly used for this purpose
Once you have lined the bottom with a layer of sand or underlay, you need to lay out the foil (we recommend PVC foil). Choose the one that is made of good quality material with a thickness of at least 1 mm. The better the quality of the foil, the longer the life of your pond
The foil should be precisely laid out and fitted into every hollow. It should be laid from the lowest point of the tank upwards. It is not advisable to stretch it – it should lie freely in the trench. At the edges we lay it with a minimum 20 cm overlap. After spreading the film we can fill the tank with water. By the way we remove all the folds that could possibly appear in the basin
The key element of building the pond is finishing its edges. It is necessary to cover the foil well so that the pond looks natural and aesthetically pleasing. Part of the shoreline is reinforced with large stones set on a layer of cement mortar. We recommend using mortar without lime, as it can harm the fish living in the tank. On the section with a gentle slope to the bottom, mound gravel at the platform. Other parts of the bank can be overgrown with grass. In order to diversify the pond, it is worth placing stones in the shallows, protruding above the water level
The last step is to fill the finished basin with water. Plants are the main decoration in the pond, and at the same time mask any imperfections in its design. They also help to maintain the biological balance – they oxygenate the water, protect it from excessive heat, provide shade and shelter aquatic animals. However, it is not worth overdoing the amount of plants in the pond – ⅓ of the surface should be uncovered